How Internet Scanners Actually Work: The 'Passive' Scanning Myth
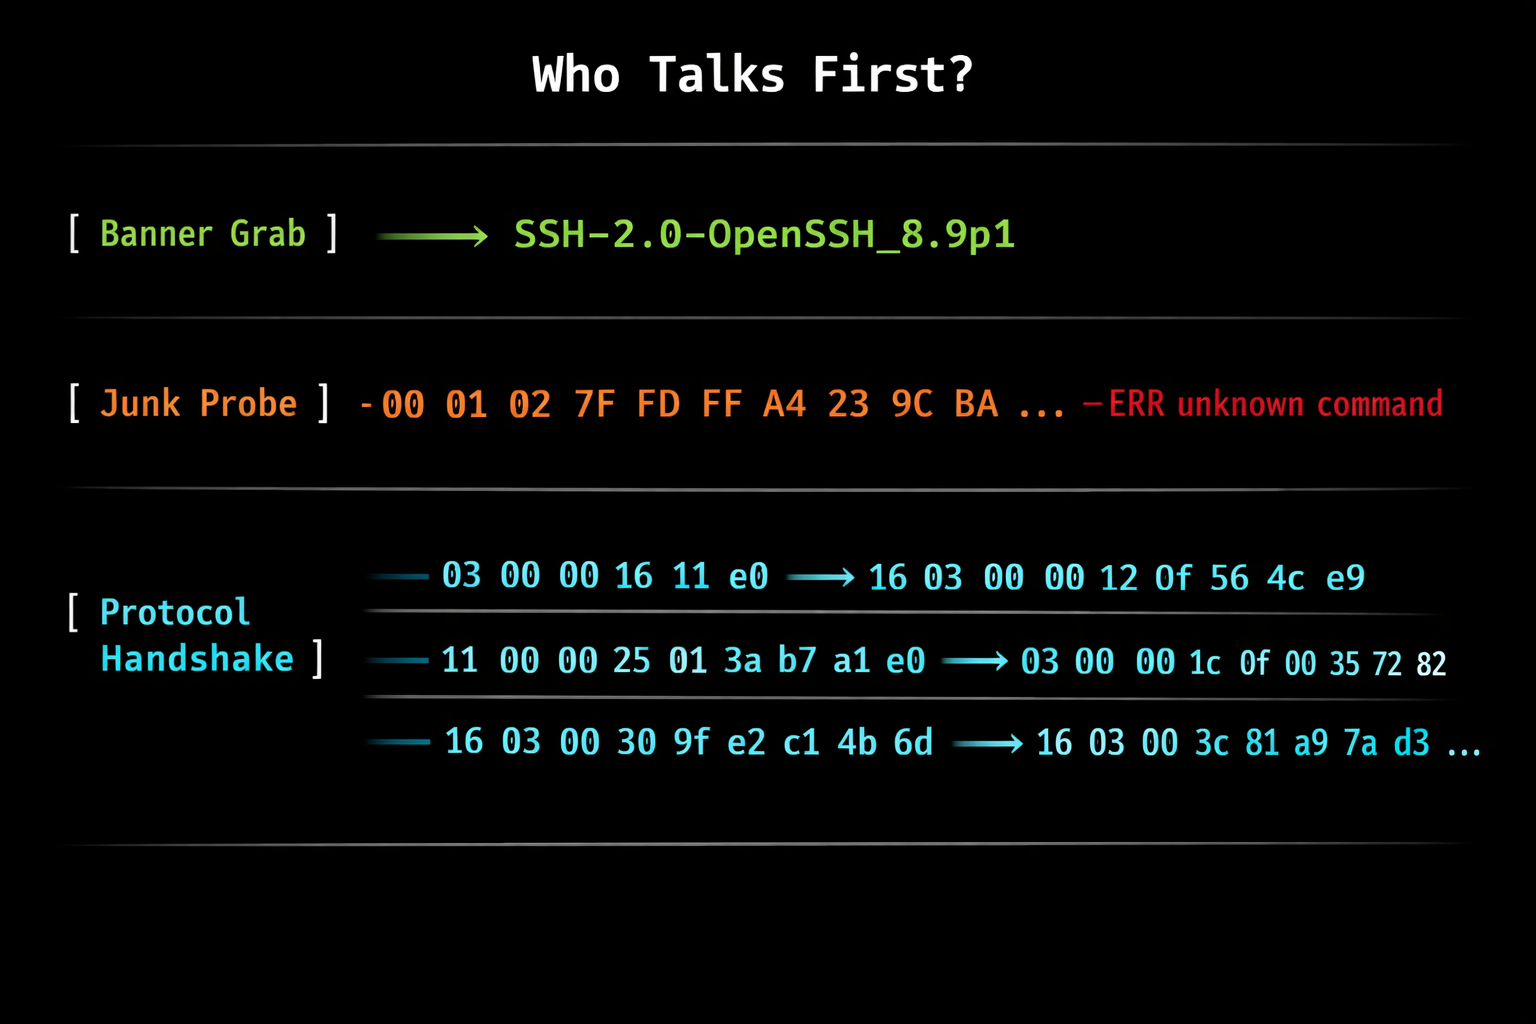
Table of Contents
Introduction
I’ve used nmap for years during pentests and CTFs, but honestly, networking was never my thing. I’d run nmap -sV, get a list of services with version numbers, and that was enough to get the job done. I never looked deeper. Like most people, I treated it as a black box.
Then I started working on LeakIX, writing detection probes, parsing binary protocols, and figuring out how to identify services across millions of IPs. That’s what I do every day now. And it turns out, protocols are actually fascinating once you dig into them. How they greet you, how they reject you, how they accidentally reveal what they are - there’s a whole world of engineering in there that almost nobody talks about.
If you’ve ever used Shodan, Censys, or ZoomEye, you probably think of them as “passive” reconnaissance tools. You type a query, you get results, no packets sent, no logs triggered. Except that’s only half the story. You didn’t scan anything. But someone did. These platforms continuously scan the entire IPv4 space, sending carefully crafted packets to every open port, performing protocol handshakes, parsing responses, and extracting version information. It’s about as active as scanning gets.
This article breaks down how service identification actually works, step by step. It starts with a simple question: who talks first?
Step 1: Banner Grabbing - The Server Speaks First
Some services are eager to tell you who they are. You open a TCP connection, and they immediately send data. No request needed. This is the cheapest and easiest form of service detection.
SSH
Connect to port 22, and SSH immediately sends:
SSH-2.0-OpenSSH_8.9p1 Ubuntu-3ubuntu0.6That’s the protocol version, the software name, the exact version, and even the OS. All for free, just by opening a TCP socket.
This is how nmap handles it. In the nmap-service-probes file, the very first probe defined is the NULL probe (line 33):
Probe TCP NULL q||
totalwaitms 6000
tcpwrappedms 3000
It sends literally nothing (q|| = empty payload). It just connects and waits up to 6 seconds for data. Then it matches the response against thousands of regex patterns (line 3607):
match ssh m/^SSH-([\d.]+)-OpenSSH[_-]([\w.]+)\r?\n/i p/OpenSSH/ v/$2/ i/protocol $1/If the banner matches, nmap knows it’s OpenSSH, extracts the version, and moves on. No probing required.
FTP
Same concept. Connect to port 21:
220 ProFTPD 1.3.5e Server (Debian)The 220 status code, the software name, the version, the OS. Handed to you on a silver platter.
MySQL
This one is interesting because it sends a binary greeting, not ASCII text. When you connect to port 3306, MySQL immediately sends a handshake packet:
5a 00 00 00 0a 38 2e 30 2e 33 36 ...Breaking it down:
- First 3 bytes: packet length
- 4th byte: sequence number (
0x00) - 5th byte: protocol version (
0x0a= 10) - Then the null-terminated version string:
8.0.36
Nmap matches this binary pattern (line 2257):
match mysql m/^.\0\0\0\x0a([\d.]+)/ p/MySQL/ v/$1/Even though the greeting is binary, it’s still server speaks first. A scanner can identify MySQL on any port just by connecting and reading what comes back.
The NULL probe flow
Here’s the actual detection flow from nmap’s documentation:
- Open a TCP connection
- Send nothing (NULL probe)
- Wait up to 6 seconds for data
- Match the response against ~3,000 regex patterns
- If matched: done. If not: move to active probes
For a full demonstration of this process, see nmap’s worked demo.
This is the cheapest scan you can do. Connect, wait, read. The scanner doesn’t even need to know what protocol to expect - it just connects to every port and checks what comes back against a massive list of patterns. For internet-wide scanning, this is free real estate.
Step 2: The Junk Probe - Tell Me How You Insult Me
Here’s where it gets interesting. Many services don’t say anything when you connect. They wait for you to talk. But here’s the trick: you don’t need to speak their language. You just need to make them react.
The idea is simple: send noise. Not a valid HTTP request, not a proper Redis command - just something that no protocol would consider valid input.
Why? Because different protocols reject invalid input in different ways. Each service has its own way of telling you to go away. And that rejection is a fingerprint.
Tell me how you insult me, and I’ll know who you are.
This is exactly what nmap does. After the NULL probe, it sends \r\n\r\n - two blank lines, nothing more (GenericLines - line 5366). That’s not a valid command in any protocol. It’s just noise. But noise that every service reacts to differently.
How it works in practice
Send something unexpected to an unknown port. Here’s what different services send back:
Redis responds with its RESP error format:
-ERR unknown command '', with args beginning with:That -ERR prefix is shared with POP3, but the message itself is unmistakable. POP3 would say something like -ERR Invalid command. Redis tells you it received an unknown command with args - that’s RESP protocol vocabulary. The full error message is the fingerprint, not just the prefix.
SMTP responds with its status code format:
500 5.5.1 Invalid commandHTTP responds with a classic status line:
HTTP/1.1 400 Bad RequestThat’s right - HTTP servers don’t stay silent when they receive garbage. They complain about it with a proper HTTP error response, complete with status code and headers. You can identify an HTTP server without ever sending a valid HTTP request.
MongoDB might drop a BSON-formatted error. MQTT might send a malformed CONNACK. Each protocol has its own error DNA.
This works because of nmap’s fallback matching system. When a response doesn’t match the patterns for the probe that triggered it, nmap checks it against patterns from all preceding probes as well. Send \r\n\r\n to a Redis server - you never intended to talk to Redis, but the -ERR response matches Redis patterns anyway. The probe doesn’t need to know what service it’s talking to. It just needs to make the service talk back.
Why not send a GET / instead?
You might think: why not send GET / HTTP/1.0 as the junk probe? It would trigger a response from more services, right?
No. \r\n\r\n already does the job. Every service that has something to say will respond to it with its own error format, and that’s all you need to identify it. A GET request is a real HTTP command - it belongs in step 3, when you’ve decided to actually speak HTTP to a specific port. Sending it blindly to every service is wasteful: it’s longer, some services might try to partially parse it and hang, and it gives you nothing that two blank lines didn’t already give you.
The NULL probe and GenericLines together cover the vast majority of identifiable services. Nothing sent, then noise sent. Two chances, near-zero cost. Everything after that is a protocol-specific handshake - step 3.
Services caught by the junk probe
This step catches a surprising number of services:
- Redis - RESP error format (
-ERR ...) - Memcached -
ERROR\r\norCLIENT_ERROR ... - SMTP -
500or502status codes with RFC-formatted messages - POP3 -
-ERRresponses (different format than Redis) - IMAP -
* BADor* NOresponses - HTTP -
400 Bad Requestwith HTTP headers - MQTT - Malformed CONNACK packets
You might notice that SMTP, POP3, and IMAP appear in both step 1 and step 2. That’s not a mistake - these protocols do both. They send a banner when you connect (step 1), and they respond with protocol-specific errors when you send garbage (step 2). This means you have two independent chances to identify them. If for some reason the banner grab fails or is ambiguous, the junk probe can still catch them through their error response.
Each of these can be identified just by sending nonsense and reading what comes back. No protocol knowledge needed at send time.
Step 3: Protocol-Specific Probes - Speaking the Language
After banner grabbing and junk probing, you’re left with services that stayed completely silent. No banner, no error, nothing. These are the services that require you to speak their exact protocol before they’ll respond.
This is where scanning stops being cheap.
TLS
HTTPS is a special case. You can’t just send GET / HTTP/1.0 to port 443 - the server expects a TLS handshake first. Without it, you get nothing useful.
Nmap handles this with a dedicated probe that sends a raw SSLv3 ClientHello (line 13688):
Probe TCP SSLSessionReq q|\x16\x03\0\0S\x01\0\0O\x03\0...|Breaking down the bytes:
\x16- TLS record type: Handshake\x03\x00- Protocol version: SSLv3\x00\x53- Record length\x01- Handshake type: ClientHello- Then: random bytes, cipher suite list, compression methods
The server responds with a ServerHello + certificate chain, which reveals the certificate details, supported TLS versions, and cipher suites. Nmap’s ssl-cert.nse script extracts all of this.
This is a real cryptographic handshake. When Shodan shows you a TLS certificate for a host, someone performed this handshake on your behalf.
Binary Industrial Protocols: The Deep End
Now we get to protocols that most people never think about. Industrial Control Systems (ICS) and Operational Technology (OT) protocols that control physical infrastructure - power grids, water treatment plants, manufacturing lines.
I write detection probes for these protocols on LeakIX. I’m not going to reveal the secret sauce, but the underlying concepts are public knowledge - nmap’s NSE scripts implement the same logic. Here’s how it works.
Siemens S7 (COTP)
Siemens S7 PLCs communicate over the ISO-TSAP protocol on port 102. To identify one, you need a three-phase handshake (source):
Phase 1 - COTP Connection Request:
03 00 00 16 11 e0 00 00 00 14 00 c1 02 01 00 c2 02 01 02 c0 01 0a03 00- TPKT version 300 16- Total length (22 bytes)11 e0- COTP Connection Request PDUc1 02 01 00- Source TSAPc2 02 01 02- Destination TSAP (rack 0, slot 2)c0 01 0a- TPDU size
Phase 2 - S7comm Setup Communication:
03 00 00 19 02 f0 80 32 01 00 00 00 00 00 08 00 00 f0 00 00 01 00 01 01 e0The magic byte 0x32 at position 8 identifies the S7comm protocol.
Phase 3 - SZL Read Request:
03 00 00 21 02 f0 80 32 07 00 00 00 00 00 08 00 08 00 01 12 04 11 44 01 00 ff 09 00 04 00 11 00 01This requests the System Status List (SZL) with ID 0x0011 (module identification), which returns the hardware model, firmware version, serial number, and system name.
There is no S7 service probe in nmap’s probe file. This is handled entirely by the s7-info.nse NSE script, which implements this full three-phase exchange.
You cannot identify a Siemens PLC by connecting and waiting. You cannot identify it by sending garbage. You need to speak its exact binary protocol. And internet-wide scanners do exactly this.
Modbus
Accidental detection: Here’s something interesting. Even though nmap has no dedicated S7 or Modbus probes, it sometimes gets a response from these services anyway. The TerminalServerCookie probe (designed for RDP) starts with
\x03\x00- which happens to be a valid TPKT header. When this probe hits an S7 server, the server interprets it as a COTP Connection Request and sends back a Connection Confirm (\xd0). Similarly, the LDAPSearchReq probe starts with\x30\x84(an ASN.1 SEQUENCE tag), which a Modbus server tries to parse as an MBAP header - and responds with an exception frame (\x02\x81\x02- illegal data address). Nmap captures these bytes in its “unrecognized service fingerprint” output but has no signature to match them. The responses are there in plain sight - nmap just doesn’t know what it’s looking at. If you can read TPKT/COTP or Modbus exception frames, you can identify these services from nmap’s own output, even when nmap itself can’t.
Modbus is the lingua franca of industrial control. Port 502. Like S7, it requires specific binary payloads (source):
Function 0x11 - Report Slave ID:
00 00 00 00 00 02 01 1100 00- Transaction ID00 00- Protocol ID (0 = Modbus)00 02- Length (2 bytes follow: unit ID + function code)01- Unit ID11- Function code (Report Slave ID)
The first 6 bytes form the MBAP header (not Mbappé - Modbus Application Protocol header). The length field is 16-bit big-endian, telling the receiver how many bytes follow.
Function 0x2B/0x0E - Read Device Identification:
00 00 00 00 00 05 01 2b 0e 01 00This retrieves vendor name, product code, and firmware version from the device. You’re sending Modbus commands to industrial equipment to make it identify itself.
When Probes Break Things
There’s a cost to all of this that goes beyond bandwidth. These industrial devices weren’t designed to handle internet traffic.
A Siemens S7-300 PLC typically supports 8 to 32 concurrent COTP connections. That’s it. When a scanner opens connections to identify the service, it consumes those slots. If enough connections pile up - or if they don’t close cleanly - the legitimate HMI/SCADA connections get rejected. The PLC loses contact with its control system.
And remember the accidental detection we just discussed? Every time nmap sends its TerminalServerCookie probe (rarity 7 - it’s sent frequently) and it happens to hit an S7 service, the PLC allocates a COTP connection, sends back a Connection Confirm, and waits for the next phase of a handshake that will never come. The connection sits there, occupying a slot, until it times out.
The probes used by nmap’s NSE scripts are read-only - Report Slave ID (0x11) and Read Device Identification (0x2B) don’t modify anything. But not all scanners are that careful. A Modbus write function (0x06 - Write Single Register) sent to an exposed PLC could change a register value that controls a physical process. This isn’t theoretical - it’s why ICS-CERT advisories regularly warn about exposed Modbus/S7 devices.
This is the uncomfortable truth about scanning industrial protocols: the act of identifying the service can degrade it. It’s not like sending a GET request to an nginx server that handles millions of connections without blinking. These are embedded devices running on decades-old firmware with minimal resources. Scanning them responsibly requires careful rate limiting, clean connection teardowns, and an understanding that every probe has a real cost on the other end.
The Scaling Problem
Now here’s the part nobody talks about.
Steps 1 and 2 are cheap. You connect, you wait for a banner, you send garbage, you read errors. One connection, two chances to identify the service. You can do this across the entire internet efficiently.
Step 3 is where it gets expensive. If a service didn’t respond to the banner grab or the junk probe, you’re left guessing. Is it HTTP? TLS? S7? Modbus? Something else entirely?
You’d have to try every possible handshake. Nmap defines dozens of protocol-specific probes in nmap-service-probes. Sending all of them to every unidentified port on every IP on the internet is:
- Slow - Multiple round-trips per port, some handshakes involve 3+ exchanges
- Aggressive - Some services crash or misbehave when they receive unexpected binary data
- Expensive - Bandwidth and infrastructure costs multiply with each probe
The Port-Based Optimization
The practical solution: filter by default port. If it’s 443, try TLS. If it’s 102, try S7. If it’s 502, try Modbus.
This is exactly what nmap does. Look at the probe definition for TLS:
Probe TCP SSLSessionReq q|\x16\x03\0\0S\x01\0\0O\x03\0...|  # line 13688
ports 443,444,465,636,989,990,992,993,994,995,1241,1311,2252,3388,3389,4433,4911,5007,5061,...Each probe has a ports directive that limits which ports it’s sent to. This is an explicit acknowledgment that you can’t send everything everywhere.
Note the distinction here: for HTTP, step 2 already told you “it’s an HTTP server” through the 400 Bad Request. Sending a GET / afterward is just enrichment - you want the actual page content, the Server header, the HTML title to fingerprint the application. That’s not detection, it’s reconnaissance. But for TLS, S7, or Modbus, there’s no step 2 shortcut. These protocols give you absolutely nothing until you speak their exact language.
Nmap also uses a rarity system (0-9) and an intensity setting. At default intensity 7, only probes with rarity <= 7 are tried. At --version-light (intensity 2), only the most common probes run. At --version-all (intensity 9), everything is tried.
For internet-wide scanning, you use the equivalent of --version-light. You scan the default port for each protocol, and you get ~90% of the results for ~10% of the cost.
The remaining 10% - the HTTP server on port 45321, the S7 PLC on port 10102, the TLS service on port 9999 - would require sending multiple protocol handshakes to every single unidentified TCP port. That means several probes per connection, across billions of ports. It’s technically possible, but the cost is disproportionate.
That said, this is evolving. Not all protocol handshakes are equally expensive. Some are just a few bytes with an instant yes/no response - cheap enough to try on every silent port without blowing up your bandwidth budget. The strict “default port only” approach leaves real services in the dark just because they run on a non-standard port. Modern scanners are finding ways to close that gap for select protocols, pushing detection beyond port assumptions while keeping the cost under control. The 90/10 split is getting better.
When Scanning Catches Liars: Honeypots
There’s a flip side to all of this. Honeypots know exactly how scanners work. They’re designed to impersonate real services, and they use the same detection logic in reverse - they recognize which protocol you’re trying to speak and respond accordingly.
This creates an interesting problem. A real ADB (Android Debug Bridge) service on port 5555 will respond to ADB commands. A real MongoDB on port 27017 will respond to MongoDB queries with BSON. But a honeypot on port 5555 might respond to both - send an ADB handshake, you get a valid ADB response. Send a MongoDB query to the same port, you get a valid MongoDB response. Same IP, same port, two different identities.
A real service speaks one protocol. It doesn’t suddenly become MongoDB when you ask nicely. If the same port claims to be two different things depending on what you send, you’re not talking to a real service. You’re talking to something that’s trying very hard to look like one.
This is why multi-probe scanning is useful beyond just identification. By sending different probes to the same target and comparing the responses, you can spot inconsistencies that no legitimate service would produce. It’s not just about finding services - it’s about finding the ones that are too eager to be found.
What This Means for Shodan
When you search Shodan for product:redis, you’re seeing services that Shodan found by:
- Connecting to port 6379 on every IP
- Waiting for a banner (step 1) - nothing comes
- Sending garbage bytes (step 2) - Redis responds with
-ERR - Optionally: sending a Redis
INFOcommand (step 3) to extract version, memory usage, etc. - Parsing everything and indexing it
That’s active scanning. The same type of active scanning you’d do with nmap. The only “passive” part is your query - you’re searching an already-built database.
Platforms like Shodan, Censys, BinaryEdge, and LeakIX invest massively in infrastructure to do this at scale. They have distributed scanner networks, carefully tuned rate limiting, and engineering teams that write and maintain detection probes. The same type of work that goes into nmap’s nmap-service-probes file.
The Full Picture
Here’s the complete detection pipeline, from connection to identification:
| Step | Method | What it catches | Cost |
|---|---|---|---|
| 1 | Banner grab - connect, send nothing, read | SSH, FTP, SMTP, MySQL, POP3, IMAP | Near zero |
| 2 | Junk probe - send garbage, read errors | Redis, HTTP, Memcached, MQTT, and many more | One extra round-trip |
| 3 | Protocol handshake - speak the exact protocol | TLS, S7, Modbus, and other truly silent services | Varies - lightweight probes can scale, complex handshakes stay port-filtered |
Most services on the internet fall into steps 1 and 2. The expensive step 3 is reserved for protocols that require proper handshakes, and it’s optimized by targeting default ports.
Conclusion
Next time you run a Shodan query, remember:
- You performed passive reconnaissance
- Shodan performed active scanning on your behalf
- Someone wrote the detection probe that identified the service
- Someone maintained the infrastructure that scanned billions of IPs
- The “passive” label only applies to your side of the interaction
And if you think this only applies to scanners - open Wireshark next time. When it labels a packet as “S7comm” or “Modbus”, it’s doing the exact same thing: reading raw bytes, matching magic numbers, parsing binary structures. Try reading a COTP handshake or a Modbus MBAP frame in raw hex without Wireshark’s dissectors. Good luck figuring out that 03 00 00 16 11 e0 is a TPKT connection request on your own.
Same thing with Shodan. When you search for S7comm, Modbus, or OPC UA devices and get a clean result page with firmware versions, module names, and serial numbers - that didn’t come for free. Someone sent a three-phase COTP handshake, parsed the SZL response, extracted the fields from binary data, and indexed it. The pretty results page is the tip of the iceberg. The heavy active scanning underneath is what makes it possible.
So who talks first? It doesn’t matter. What matters is how the other side reacts when you say something wrong. That one insight - that services reveal themselves through their errors - is what powers every internet scanner on the planet. And now you know how it works.
Further Reading
- nmap-service-probes - The full probe definition file (~2.5 MB of patterns)
- nmap Version Detection Documentation - Detailed algorithm explanation
- nmap Service Probes File Format - How probes and matches are defined
- s7-info.nse - Siemens S7 PLC identification script
- modbus-discover.nse - Modbus device enumeration
- redis-info.nse - Redis server information extraction
- mysql-info.nse - MySQL server greeting parser
- ssl-cert.nse - TLS certificate extraction
- Revealing the Black Box of Device Search Engines - Excellent research paper analyzing how Shodan, Censys, FOFA, and ZoomEye actually behave in the wild. The authors deployed 28 honeypots for a year and caught scanners doing things like
keys *on Redis, exploiting RDP vulnerabilities, and screenshotting IP cameras. Fair warning: it’s an academic paper, not a light read. But if you want to see just how aggressive these “passive” platforms really are behind the scenes, this is the one.